Looking for an easy and efficient way to install Whisper on Windows? This powerful Artificial Intelligence tool will allow you to transcribe audio and video with astonishing accuracy.
In this article, we’ll provide you with a detailed, multi-step guide to set up Whisper on your Windows operating system. This way, you can fully leverage its capabilities and streamline your transcription tasks.
Process to Install Whisper on Windows
To use the Whisper transcriber on Windows 10 or 11, you’ll need to install the following programs:
- Python 3.8-3.11
- Chocolatey
- CUDA (For NVIDIA GPU users)
- PyTorch
To avoid getting lost in the process, you should follow the order we propose below. You’ll find links that will take you to the section detailing the installation process for each program. Once you’ve completed that part, come back to this section to continue with the next step.
Installation Process:
- Install Python. See how to install Python on Windows.
- Install Chocolatey. See how to install Chocolatey on Windows.
- Install CUDA (For NVIDIA GPU users). See how to install CUDA on Windows.
- Download the GitHub repository prepared by MISTER CONTENIDOS. See how to download the repository.
- Obtain the PyTorch installation command. See how to get the PyTorch installation command on Windows.
- Install Whisper. See how to install Whisper on Windows.
- How to use Whisper. See usage guide.
- Configuring Whisper for optimal performance.
Downloading and Installing Python on Windows
Downloading Python is essential for using Whisper, as it is used in web development, data science, automation, and much more.
To install Python on Windows, follow these steps:
- Access the official Python website: Open your browser and visit the official Python website, python.org. Navigate to the (Downloads) section.
- Download the Python installer: The recommended version of Python according to the official Whisper repository on GitHub is 3.8 – 3.11. Select the version of Python you want to install and click the download button for the Windows installer (64-bit). We used version 3.11.3 and everything went smoothly.
- Run the installer: Once the file is downloaded, locate it in your downloads folder and double-click to start the installation process. You’ll see the Python installer window.
- Select the installation options: Before proceeding, make sure to CHECK THE BOX (Add Python.exe to PATH) at the bottom of the installer. This will make it easier to run Python from the command line.
- Start the installation process: Click (Install Now) to begin the installation with the default settings. The installer will ask for administrator permissions. Accept to continue.
- Wait for the installation to complete: The process may take a few minutes. You’ll see a progress bar showing the installation progress. Once finished, you’ll have Python installed on your PC.
That’s it! You’ve now installed Python on Windows. You’re ready for the next step.
Downloading and Installing Chocolatey on Windows
The Chocolatey installation process is necessary to install FFmpeg, a cross-platform tool that allows you to process audio and video.
To install Chocolatey on Windows, follow these steps:
- Open PowerShell as an administrator: Search for the PowerShell terminal, right-click on it, and select the Run as administrator option.
- Verify the PowerShell execution policy: In the PowerShell terminal, type the following command
Get-ExecutionPolicy. The idea is to verify that it says ALLSigned. - Configure ALLSigned in PowerShell: If running the command in the previous step doesn’t show the ALLSigned message, you’ll need to change the execution policy using the following command,
Set-ExecutionPolicy ALLSigned, and confirm the change with an “S” or a “Y” depending on the language of your PC. - Install Chocolatey: To perform the installation, go to the official Chocolatey installation page, copy the command that starts with
Set-ExecutionPolicy Bypass, paste it into the terminal, and press Enter. - Verifying the installation: To verify that Chocolatey has been correctly installed on your computer, you must close the current PowerShell window and open a new one to execute the following command:
choco -v. This will show you the version of Chocolatey installed.
That should be more than enough to complete the Chocolatey installation. The installation of FFmpeg will be done automatically when we install the project to install Whisper on Windows.
The Process of Downloading and Installing CUDA
If you have an NVIDIA graphics card in your computer, you can install something called CUDA to improve its performance on specific tasks. If you don’t have a card from this brand, you can skip this step.
For detailed and specific information on CUDA version compatibility, it’s always recommended to consult the official NVIDIA documentation and developer forums for the latest updates and recommendations.
In this guide, we’re installing CUDA 12.1.0 (February 2023) for an RTX 3060 12GB and it works correctly.
To install CUDA on Windows, follow these steps:
- Verify the compatibility of your graphics card with CUDA: Before starting the installation, it’s important to ensure that your graphics card is compatible with CUDA. You can check the list of compatible graphics cards on the official CUDA GPUs page.
- Download the CUDA Toolkit installer: Visit the official CUDA Toolkit download page and select the version of CUDA you want to install. Make sure to choose the Windows version, the architecture of your system (e.g., x86_64), the operating system version 10 or 11, and the installer type (local exe). CUDA 11.8 and 12.1 are usually the most common.
- Run the installer as an administrator: Once the installer is downloaded, right-click on the file and select the Run as administrator option to start the installation process.
- Follow the CUDA Toolkit installer instructions: The installer will guide you through several steps. It’s recommended to keep the default options unless you have specific requirements.
- Verify the installation: Once the installation is complete, you can verify that CUDA has been installed correctly by opening a command prompt (cmd) and running the command
nvcc --version. This command should display the version of the CUDA Toolkit you have installed.
There you go, with these steps, you should have completed the installation of CUDA on Windows, preparing your system for the development of applications that take advantage of the processing power of Nvidia GPUs.
Downloading the GitHub Repository
To download the GitHub repository prepared for the installation and use of Whisper on Windows, follow these steps:
- Download the repository: Navigate to our GitHub repository Whisper-Transcription-Kit and download the project by clicking the green (code) button at the top, download the ZIP file, and extract it to your desktop.
- Create two folders: Inside the downloaded project create two folders, one with the name
inputand the other with the nameoutput.
Downloading and Installing PyTorch on Windows
For the PyTorch installation on Windows, we need to consider two scenarios:
- Users with NVIDIA GPUs. (Follow the Scenario 1 installation)
- Users with other GPU brands or without graphics cards. (Follow the Scenario 2 installation)
Scenario 1 – Using CUDA
To install PyTorch on Windows with CUDA, follow these steps:
- Verify your CUDA version: In case you don’t know which version of CUDA you have installed, open (cmd) and paste the following command
nvcc --version
Important note: If you have installed or installed the CUDA 12.1.0 (February 2023) version, the “setup_environment.bat” script in our GitHub project will automatically download and install PyTorch for the use of Whisper.
If you don’t have this CUDA version installed, you’ll need to follow these steps:
- Obtain the PyTorch installation command: Go to the official PyTorch website to copy the installation command. Select the configuration you want using the boxes, make sure to use the Stable, Windows, Pip, Python, and the CUDA version you have installed. Copy the command in the (Run this Command) box.
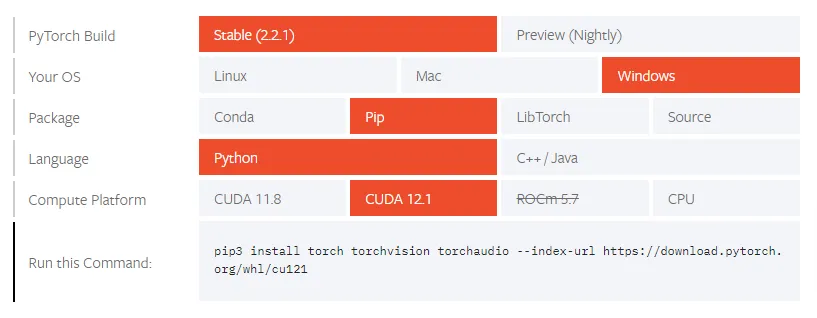
- Update the installation command: In the project you downloaded from GitHub earlier, find the (setup_environment.bat) file. Right-click on it and select the edit option. Inside the file, look for the line of code
pip install torch torchvision torchaudio --index-url <https://download.pytorch.org/whl/cu121>and replace it with the installation command you copied from the PyTorch website. Then save the changes with ctrl+g.
Note: If you need a different version of PyTorch, you can find all the installation commands for previous versions of PyTorch here, select the command that starts with Pip.
Scenario 2 – Using CPU
If you have a non-NVIDIA graphics card or no graphics card at all, you’ll need to follow these steps to install PyTorch on Windows using your CPU as the computing platform.
- Obtain the PyTorch installation command: Go to the official PyTorch website to copy the installation command. Select the configuration you want using the boxes, make sure to use the Stable, Windows, Pip, Python, and the CPU option. Copy the command in the (Run this Command) box.
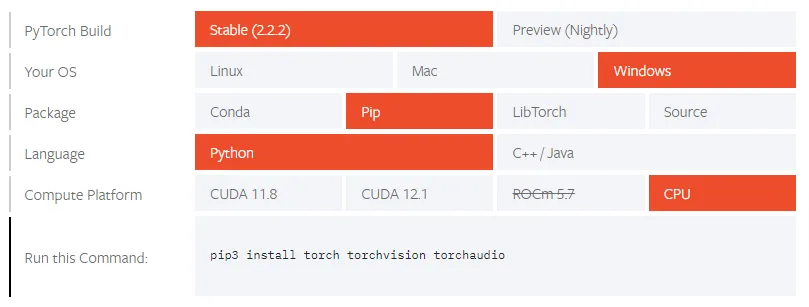
- Update the installation command: In the project you downloaded from GitHub earlier, find the (setup_environment.bat) file. Right-click on it and select the edit option. Inside the file, look for the line of code
pip install torch torchvision torchaudio --index-url <https://download.pytorch.org/whl/cu121>and replace it with the installation command you copied from the PyTorch website. Then save the changes with ctrl+g.
This should be enough to start the automatic installation process of the other dependencies to install Whisper on Windows.
How to Download and Install Whisper on Windows
To install Whisper on Windows, we’ve created a project that you can download from GitHub to automate much of the installation and usage process for this tool.
To download the repository created by the Mister Contenidos team, follow these simple steps:
- Run as Administrator (setup_environment.bat): In the project downloaded from GitHub earlier, look for the (setup_environment.bat) file. Right-click on it and select the “Run as administrator” option. This file will create a virtual environment using Python to install FFmpeg, PyTorch, and Whisper. (It requires administrative permissions to install FFmpeg using Chocolatey)
That’s it! The Whisper installation process on Windows is complete.
Note: In the GitHub repository, you’ll find more detailed information about the function of each file and additional project information.
How to Use Whisper on Windows?
If you’ve followed the installation guide above, using Whisper is as simple as following these steps:
- Input Folder: In this folder, you can place your audio or video files to be transcribed.
- run_script.bat File: Once you have your audio or video files in the (input) folder, double-click the (run_script.bat) file. This will open a (cmd) window and execute the Python script responsible for using Whisper to transcribe your files. The first time you run it, it may take a bit longer to complete the transcription.
- Output Folder: Once the execution of the previous script is complete, you’ll find the transcriptions of your files in this folder. (They will have the same name as your source file)
Important Notes: This project uses the (medium) model to perform the transcriptions. After some tests in Spanish and English, we found that in terms of time/quality ratio, this is the model you should use to get high-quality transcriptions. With an RTX3060 12GB graphics card and a 4-minute Spanish audio, it takes around 33 seconds to complete a Spanish transcription.
Configuring Whisper for Optimal Performance
After successfully installing Whisper, it’s time to configure it for optimal performance, especially if you don’t have a graphics card or if it takes too long to generate your transcriptions. Follow these steps to configure the Whisper model used:
- Edit the (transcribe.py) file: Use any code editor you have available or simply right-click on this file and select the “Edit” option. Look for the words (medium), there are two, and change them to one of the following (small – base – tiny).
Try each of the above versions to see which one performs best for your specific case. The (small) version is relatively 4 times faster than the medium version and requires 3 GB less VRAM to run.
Congratulations! You’ve successfully configured Whisper for optimal performance. Now you can take advantage of its powerful features to streamline your workflows and improve your experience on Windows.